

Observe ZDNET: Add us as a preferred source on Google.
ZDNET’s key takeaways
- One-click iTerm2 setup launches Claude tasks, making a coding hub.
- Profiles auto-load context and reminiscence recordsdata on startup.
- Shade-coded tabs get rid of challenge confusion immediately.
Positive, vibe coding is a powerful tool that may save time in comparison with hand-cutting code line by line. However anybody who has constructed something with vibe coding can let you know this: there’s still a lot of work involved.
For the previous few months, I have been using Claude Code to build two apps that may finally be delivered for Mac, iPhone, iPad, and Apple Watch. One has reached the testing stage, whereas one other remains to be very a lot in early-stage improvement.
At first, I did what everybody does after they start using Claude Code. I used a terminal window. However my Claude Code work really entails working in three contexts, one for every of the 2 apps I am constructing and one which’s one stage up and might take a look at each apps.
Additionally: I built two apps with just my voice and a mouse – are IDEs already obsolete?
No matter listing you are in once you launch Claude Code turns into the challenge’s house listing. It is the listing Claude seems in for the CLAUDE.MD file, which tells the AI about your challenge. Claude treats this present working listing as the basis listing in your challenge.
In my case, /Customers/david/Paperwork/Improvement/xcode holds each challenge directories, MyFilamentStash and MySewingPatternStash.
For months, my course of was to open Terminal, change listing (utilizing the cd command) to one of many three directories, launch Claude, and supply a set of startup instructions to assist the session stand up to hurry with earlier work.
Then, if I needed to change to a special context, I give up Claude, issued a cd to a different challenge listing, and did the identical. I do know. It is cumbersome. I additionally know I may have had a number of terminal home windows open directly, however I discovered myself getting confused about which challenge was energetic at any given time.
Additionally: Google’s Gemma 4 model goes fully open-source
Though I used to be vibe coding and the AI was writing the precise code, it was nonetheless time to optimize my work surroundings.
iTerm2 vs. Mac Terminal
The Mac’s native Terminal application has come a good distance for the reason that early days of the Mac. The app helps tabs, profiles, and plenty of configuration choices. However iTerm2, a free, GPL-licensed, open-source terminal program, is much more configurable. Plus, iTerm2 has vertical panes along with tabs, which may come in useful now and again.
Over time, I’ve typically used Mac Terminal for system-level tweaks to my Mac and iTerm2 when utilizing the command line for coding work. That is not a obligatory distinction, nevertheless it’s what my follow has been.
Additionally: I built an iOS app in just two days with just my voice
I will be discussing methods to arrange iTerm2 for an optimum vibe-coding startup, however Mac Terminal’s profile options assist an analogous set of capabilities. You will get to these capabilities from the Settings menu.
Home windows Terminal additionally helps this sort of profile customization. You may handle these settings by clicking the dropdown arrow subsequent to the tabs and deciding on Settings in Home windows Terminal.
Shade coding the tabs
For my improvement course of, I arrange 4 profiles in iTerm2. You get to profiles by deciding on the Settings menu after which tapping the profiles icon. As talked about above, I’ve one profile for every challenge, one for the guardian of each tasks, and one which works in my Mac house listing in case I must do something there.
For readability, I’ve color-coded every profile. That method makes it instantly clear what challenge I am engaged on when in that tab. The 2 tasks have distinct coloration identities. The filament challenge is blue and gold with jewel tones. The stitching patterns challenge is in pinks and purples.
I utilized these coloration identities to the terminal profiles. You may see the colour distinction under. This course of is how I arrange the profile for my filament app challenge. Observe the blue and gold hues taken from the app consumer interface. You may see that even the tab itself matches the colour theme:
In contrast, word the purple and pink taken from the stitching sample app. You may see the tab can also be purple for this challenge:
This type of coloration differentiation makes it tremendous simple to inform which challenge I am engaged on at any time. Organising is straightforward. Open Settings in iTerm2, click on Profiles, after which the Colours tab. Go down the web page and select the colours you need in your profile:
To set the tab coloration, scroll all the best way down and select a customized tab coloration:
I selected a inexperienced background with yellow textual content when working within the guardian listing of the 2 tasks. And I gave the /Customers/David profile a black background with vibrant inexperienced textual content.
Tweaking textual content dimension
You may also customise the font and dimension for every profile. I’ve a big display, so I needed my textual content pretty giant. I picked the font and dimension I favored and duplicated it for every profile. You specify textual content dimension by selecting Profiles→Textual content after which happening to the Font selector:
Setting every profile’s beginning listing
As I discussed earlier, Claude treats the present working listing when it launches as the basis of the present challenge. To routinely choose the best listing at startup, I set my listing selection in every profile.
This job can also be executed in Settings→Profiles. This time, keep within the Profiles→Basic tab. Ensure that Profile Kind is ready to Terminal (at 1), after which go all the way down to Preliminary Listing→Superior Configuration (at 2) and hit Edit:
Subsequent, for the present challenge whose profile you are in, paste the total path to that challenge into all three Working Listing fields. All three Working Listing fields will get the identical path. That means, you may all the time be working within the challenge folder in your present challenge:
Auto-configuring Claude classes
For optimum productiveness, I needed Claude totally arrange as quickly as I tapped the iTerm2 icon in my Mac’s dock. To take this method, I arrange every profile to run a command line as quickly as iTerm2 launched.
Additionally: How to install and configure Claude Code, step by step
This job is completed by setting Command to Login Shell on the Basic tab of the profile, then pasting a “Ship textual content at begin” line that is a command line to be executed at profile launch:
The command line consists of three elements: selecting the challenge listing, clearing the display, and launching Claude with a beginning immediate.
Let’s check out that preliminary command:
cd /Customers/david/Paperwork/Improvement/xcode/MySewingPatternStash && clear && claude "New session beginning. Learn each reminiscence file within the reminiscence listing one after the other utilizing the Learn software, not simply the MEMORY.md index. Verify git standing for any uncommitted work. Then give me a quick standing report: the place we left off, what's pending, and whether or not there are uncommitted adjustments."
You might need seen that the command begins with one other cd. That occurs as a result of I discovered that the change listing command did not constantly run earlier than iTerm2 invoked Claude except I used a belt-and-suspenders method to picking the beginning listing. So, I set cd as an choice, as described within the earlier part, and in addition put it right here within the command line itself.
Subsequent, I execute a transparent. This step cleans up the terminal display of among the startup cruft I do not need to see. After that, I launch Claude and provides it a reasonably intensive immediate.
Additionally: 10 things I wish I knew before trusting Claude Code to build my iPhone app
The immediate tells Claude to learn all my startup notes (referred to as reminiscence recordsdata within the reminiscence listing). That is a part of my tactic utilizing Claude. I’ve the AI document a whole lot of notes. This course of each provides me a standing report and helps Claude stand up to hurry on what occurs subsequent.
One final trick is using the && operator. In bash and other shells, the semicolon separates instructions in a sequence. However the gotcha is that even when an earlier command fails, the later instructions will run. In contrast, the && operator solely runs subsequent instructions if earlier instructions return an exit standing that signifies success.
So now, when every profile is instantiated, the command that launches Claude within the correct listing runs, and Claude does a deep dive, bringing itself in control on the challenge’s standing.
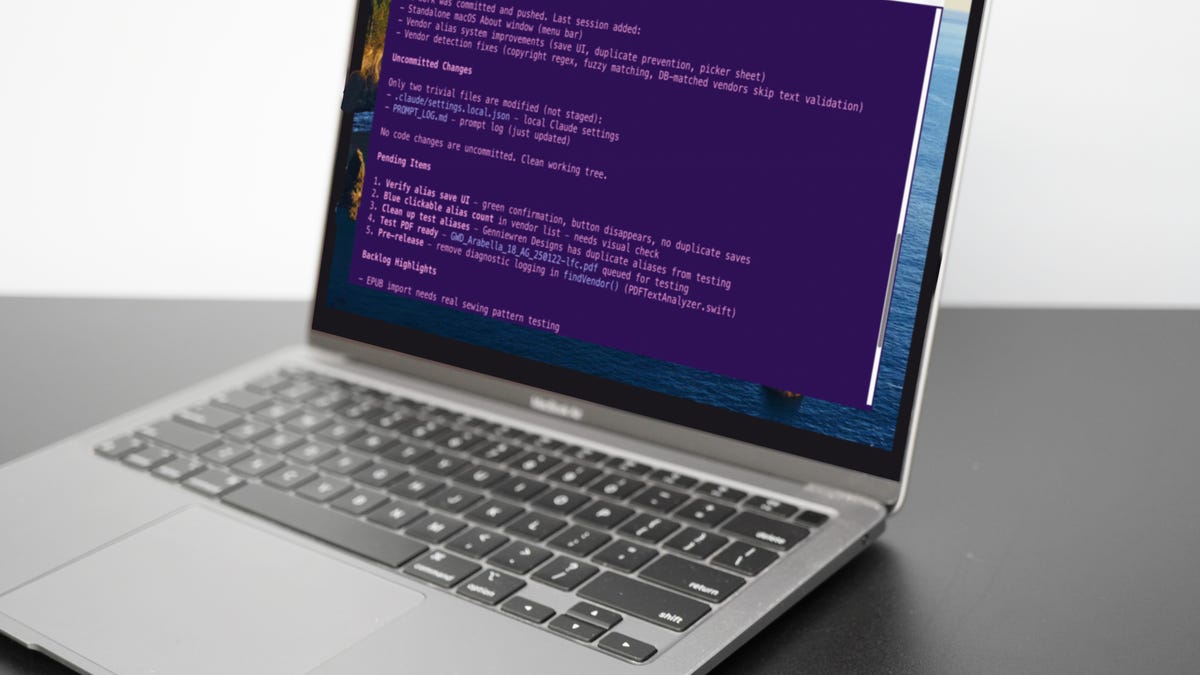
Here is an instance of the startup standing for the stitching sample challenge:
Bringing all of it collectively
By this level, we have now every challenge’s UI color-coded to the app that is being labored on, and Claude is launching with a related immediate when the profile is initialized. All that is left to do is have all 4 profiles launch routinely when iTerm2 is clicked within the dock.
Additionally: I used Claude Code to vibe code an Apple Watch app in just 12 hours
To do that step, first arrange iTerm2 so it is the best way you need it when launched. In my case, that is with all 4 profiles opened. I would like the House profile tab on the left, the guardian profile tab on the best, and the 2 apps themselves within the center tabs. I additionally moved the window to the place I would prefer it to be on the display when it launches.
This step is configured within the Settings→Preparations tab of iTerm2. As soon as your window is positioned the place you need it, with all of the tabs open and organized as you would like, go to Preparations and Set Default. This transfer will lock within the present association and open every thing this manner everytime you launch iTerm2.
1-click to manage all of them
That is it. All it takes now’s one click on on my dock icon, and iTerm2 goes to city. It units up all my tabs, units each to the right challenge listing, and launches three situations of Claude.
Then, every Claude occasion digs into its personal challenge, brings itself totally again in control on what it must know for the present work session, and presents a challenge standing abstract.
Additionally: I used Gmail’s AI tool to do hours of work for me in 10 minutes – with 3 prompts
It takes a couple of minutes for this entire course of to run, nevertheless it saves me a ton of clicks. Whereas the assorted Claudes are coming in control and briefing me on the standing, I can have a few sips of espresso to prepare for a brand new improvement session.
Now, you’ll be able to, too.
How a lot time do you suppose a one-click, multi-session Claude setup would save in your day by day coding workflow? Tell us within the feedback under.
You may comply with my day-to-day challenge updates on social media. Be sure you subscribe to my weekly update newsletter, and comply with me on Twitter/X at @DavidGewirtz, on Fb at Facebook.com/DavidGewirtz, on Instagram at Instagram.com/DavidGewirtz, on Bluesky at @DavidGewirtz.com, and on YouTube at YouTube.com/DavidGewirtzTV.


